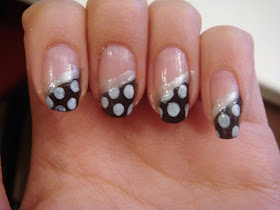
Heres another fun nail tutorial that i picked up from some other bloggers/youtubbers! i changed it up a tad bit but its quite similar to the polka dot nail tutorial that i did a while back. This time around, we're going to be drawing our tip in a diagonal line to create a fun and cool design!
heres the finished look B (for a more party sparkle version)
and finished look A (for a more toned down version)
Step One - base coat & tape!
In the above picture, i have already painted my nails with a clear base coat. This step is optional but it does help give your nails a more healthy sheen to it as the top section of your nails will be left "naked". If you do decide to apply a base coat, please let it dry completely before applying the tape!! if not, you will risk pulling off the base coat and then you'll have to start all over again!
Now for the tape, i would recommend you tape it aganist your hand first to get rid of some of the tackyness and stickyness. That way, you can also avoid pulling off some of the base coat later. When you're ready, apply the tape in a diagonal line like the picture above. You can definately experiement with how you apply the tape and come up with many different designs so be creative!
Step Two - Paint the tips!
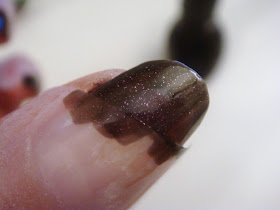
Taking a darker shade (im using Nicole by OPI in Black to the Future which is a black with purple sparkles), paint your tips! its okay if you go over the tape, thats what its there for! in the picture above, i applied two coats making sure i let the first coat dry completely before applying the second coat.
heres a close up picture so you can see the true color
Step Three - Peel the tape!
when the second coat is almost completely dry, start slowly peeling the tape off in one direction. the nail polish might come up a little bit with the tape but if you work slowly it should be fine. here's what it looks like after the tape is off! simple even diagonal lines! You can stop here if you want or to spice it up a bit more, you can even add some silver glitter just above the line to give it a boost of sparkle! (picture shown further down). Or if you want to continue...
Step Four - Add your dots!
taking a dotting tool, bobby pin or anything with a circular end to it, dip into a different nail polish (i used Nicole by OPI in shop around the clock) and apply your dots. just dot randomly wherever you see fit and if you get a bit over the line, dont panic! its fixable :)
Step Five - Add a silver line
Taking a silver shade, follow the diagonal line to give more of a polished and finished look. This can also help hide mistakes and uneven lines!
Depending on the color you choose, your nails could be more toned down like the ones above, or...
you could choose to apply a sparkly glitter silver to make it more fun!
here is a quick swatch of L.A. Colors Sparkling Diamonds.
Dont forget, be as creative as you want! For example.. you could apply a silver base coat rather than a clear one to give lots of glitter and fun (shown on the very left). or you could leave out the polka dots for a more sophisticated yet fun look (middle nail). or you could just do the tutorial above but with a fun sparkly glitter line instead of just a silver shade (far right).
in the end. i chose to do all my nails like the far right with the exception of my fourth fingers which i did like the middle nail. i always like to do something different with my fourth fingers just so that theres something different to look at and it doesnt seem as overdone :) hope you enjoyed this tutorial! it'll be back to makeup reviews next post!
Blogger Templates


No comments:
Post a Comment